


The winner of my "Vintage" Corsage Class Kit is the one and only Renee of Circling My Head. What an inspirational woman! I love her look on life and love. I hope she enjoys making the corsage...don't worry, I did some of it for you already! Enjoy my friend!
Since I am a classroom teacher during the year, I love focusing my summers on family and art. I finally bought the newest Photoshop Elements, and have been playing with new projects. I've also done some incredible research online, learning new and exciting things.
Gotta LOVE that Martha Stewart!! I was playing around, searching through her fabulous website for fun and unusual things. I found a no sew, Duck Tape Tote Bag!! There is a short instructional video. The bag was introduced by a gal named Jodi Kahn. She had many bags on display. She also has a book out called Simply Sublime Bags 30 No-Sew Low-Sew Projects. I will be purchasing this book asap!
Well, once I saw the video, I had to try it myself.
Here is my version of the step by step process...
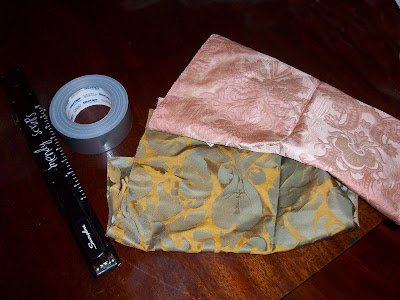
I have two squares of vintage style silk fabric, my trusty huge stapler, and my DUCK tape! My tape was in the garage, so nothing fancy. I hear that Wal-Mart has different colors of Duck Tape. Hurray! I am using two contrasting fabrics: a soft pink and a blue with gold.
 Find some trim, lace, etc., and measure out two equal strips. I was in such a hurry to try this, I just used the first trim I saw. Use your stapler and staple the strips on to the wrong side of your fabric square, up at the top. Don't go all the way through both layers, just the "flap" and the trim.
  Do the same to the other square of fabric. Now the FUN part...rip a piece of Duck Tape and just put it on top of the staples. Do the other piece as well.
 Now start attaching the two pieces together, as you would if you were really sewing, but with staples. Don't be shy, staple, staple, staple. Do the bottom too. If you were using one large rectangle of one fabric, you wouldn't even need to staple the bottom.
 Get the Duck Tape (wish mine was a prettier color!), and go around the staples. Trim the edges. You could make a "dart" on the bottom of each side with more staples, to have more of a "box" shape, but I got lazy and way too impatient to attempt that step.
 Now FLIP out the bag, shape it a little, and now you have your tote bag. It's quite sturdy and it took me about 6 minutes to make! I added one of my handmade flower corsages. This would be a great idea for kids!
  Here is the opposite side. My corsage is just pinned on, so I can move it around easily.
 I put some magazines in my bag, and it held up!
I had so much fun with my duck tape creation. I found the official duck tape website and found some amazing things. I nearly fell off my chair admiring the PROM dresses and formal Tuxes made out of the tape! Scholarships were given out for the most creative outfits.
WOW!!